In today’s digital age, our browsing history contains a wealth of information about our online activities. While this data can enhance our browsing experience, it also poses potential risks to our privacy and security. That’s where Auto History Wipe comes in. This innovative Chrome extension automatically clears your browsing history, ensuring a safer and cleaner online journey. In this comprehensive guide, we will explore everything you need to know about Auto History Wipe and how it can enhance your internet experience.
1. What is Auto History Wipe?
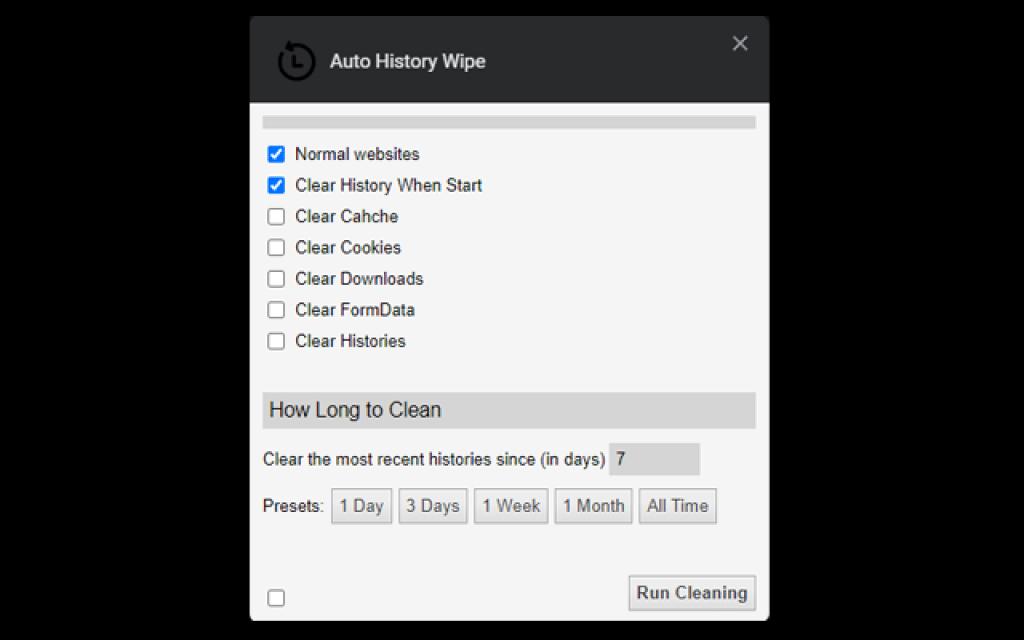
Auto History Wipe is a powerful Chrome extension that automates the process of clearing your browsing history. By defining automatic tasks, you can choose what specific data you want to remove and how frequently you want it deleted. This tool not only ensures a safer online experience but also provides a cleaner browsing session by eliminating cache data, cookies, and other digital clutter accumulated by your browser.
2. The Importance of Manually Cleaning History
Manually cleaning your browsing history and temporary files can be a tedious and time-consuming task. However, it is crucial for maintaining your privacy and optimizing your browser’s performance. Auto History Wipe takes the hassle out of this process by automating the deletion of your browsing history, allowing you to enjoy a cleaner and more secure internet experience.
Regularly clearing your browsing history has several benefits:
- Privacy Protection: Auto History Wipe keeps your browsing history clean, ensuring that your personal information and online activities remain private.
- Faster Browsing Experience: By removing clutter stored by your browser, Auto History Wipe helps improve your browsing speed and performance.
- Enhanced Security: Clearing cache data and cookies regularly prevents unauthorized access to your browsing habits, providing an additional layer of security.
3. How Does Auto History Wipe Work?
Using Auto History Wipe is simple and straightforward. The process can be broken down into three easy steps:
- Adding the Automatic Task: Install the Auto History Wipe extension, such as “Ultimate Auto History Cleaner” or “Auto Clear Browsing Data,” from the Chrome Web Store. These extensions allow you to define automatic tasks for clearing your browsing history.
- Selecting Time Intervals: Customize the frequency of history deletion by specifying time intervals. Whether you prefer daily, weekly, or custom intervals, Auto History Wipe gives you the flexibility to choose when your browsing history should be cleared.
- Choosing Data to be Removed: Decide what data should be deleted during each automatic task. Auto History Wipe allows you to select browsing history, cookies, cache, and other browsing data types for removal, tailored to your preferences.
4. Setting Up Auto History Wipe Extensions
Installing Chrome extensions, including Auto History Wipe tools, is a simple process. Here’s a step-by-step guide to getting started:
- Open Google Chrome and navigate to the Chrome Web Store.
- Use the search bar to find the desired Auto History Wipe extension, such as “Auto Clear Browsing Data.”
- Click on the extension to view additional information, user reviews, and screenshots.
- Press the “Add to Chrome” button to install the extension.
- A pop-up window will appear, asking for confirmation. Click “Add extension” to complete the installation.
- Access your newly installed extension by clicking on the puzzle-shaped icon in the top right corner of Chrome.
Auto History Wipe
Once the extension is installed, you can set up the Auto History Wipe functionality according to your preferences. For example, if you choose “Auto Clear Browsing Data,” follow these steps:
- Click the “Add A New Task” button to begin the automation process.
- Fill in the required information, such as task name, time interval, and data to be deleted (e.g., browsing history, cookies, cache).
- Save your task, and it will be listed with options to enable, disable, edit, or delete.
If you prefer “Auto History Cleaner,” open the extension’s settings and customize them to suit your needs.
5. Alternative Methods for Auto History Deletion
While Chrome extensions like Auto History Wipe provide convenient automation for history deletion, alternative methods can also help you achieve the same results. Here are a few options to consider:
5.1 Browsers with Auto History Deletion
Unlike Chrome, some browsers natively offer the option to delete browsing history automatically. For example, Firefox, Microsoft Edge, and Safari provide built-in settings to clear browsing history automatically.
To activate this feature in Microsoft Edge:
- Open Microsoft Edge and click on the three dots in the top-right corner.
- Select “Settings” and navigate to the “Privacy, search, and services” section.
- Under “Clear Browsing Data,” choose to clear data whenever you close the browser.
- Select the specific data types you want to delete, such as browsing history, cookies, and cache.
Other browsers like Firefox and Safari have similar settings, allowing you to automatically customize when and what data should be deleted.
5.2 Private Browsing Mode
Another effective way to prevent your browsing history from being stored is by using private browsing modes, such as Chrome’s “Incognito Mode” or Edge’s “InPrivate Browsing.” These modes prevent the browser from saving your browsing history, cookies, and other temporary data. Chrome Extension
To activate Incognito Mode in Chrome:
- Press Ctrl+Shift+N (or Command+Shift+N on Mac) to open a new Incognito window.
- Browse the internet as usual, knowing that your browsing history will not be stored locally.
While private browsing modes offer enhanced privacy, it’s important to note that they do not provide complete anonymity. Internet service providers and websites can still track your activity.
5.3 Scheduled Tasks
If you prefer a more hands-on approach, you can utilize scheduled tasks to automate history cleaning. Windows users can take advantage of the built-in Task Scheduler feature to create automated tasks for history deletion.
Here’s how to set up a scheduled task in Windows:
- Press Win + S, type “Task Scheduler,” and press Enter to open the Task Scheduler.
- Select “Create Basic Task” from the right-hand panel.
- Give your task a name and optionally add a description for reference.
- Choose the frequency at which you want the task to run (e.g., daily or weekly).
- Specify the start date and time for the task to begin running.
- Select “Start a program” as the action type and provide the path to your preferred history cleaning tool (e.g., Disk Cleanup or CCleaner).
- Finish creating the task and test it by right-clicking on it and selecting “Run.”
Scheduled tasks offer a hands-off approach to history cleaning, allowing you to set it and forget it while your device takes care of the rest.
6. How Often Should You Clear Your Browsing History?
The frequency at which you should clear your browsing history depends on your browsing habits and privacy preferences. Some users may prefer to clear their history daily, while others may find weekly or monthly intervals sufficient.
Regularly clearing your browsing history provides several benefits:
- Privacy Enhancement: Clearing your history reduces the amount of personal information stored by your browser, enhancing your privacy and reducing the risk of data breaches.
- Optimal Browser Performance: Removing accumulated data such as cache and cookies helps improve your browser’s performance, ensuring faster load times and smoother browsing sessions.
- Customization and Control: Clearing your history allows you to start each browsing session with a clean slate, avoiding personalized recommendations based on past activities.
Ultimately, the decision of how often to clear your browsing history is a personal one. Assess your privacy needs, browsing habits, and device performance to determine the optimal frequency for history deletion.
9. FAQs: Clearing Your Browsing History
Q1: Can I exclude specific websites from being cleared by Auto History Wipe?
Q2: Is Auto History Wipe compatible with mobile browsers?
10. Conclusion
In conclusion, Auto History Wipe is a valuable tool for enhancing your browsing experience by automating the deletion of your browsing history. Whether you use Chrome extensions, alternative methods, or scheduled tasks, regular history cleaning helps protect your privacy, improve browser performance, and give you greater control over your online activities.
By leveraging the power of Auto History Wipe, you can enjoy a safer and cleaner browsing experience, ensuring that your digital footprint remains private and secure. Take the necessary steps to safeguard your privacy and optimize your internet experience by integrating Auto History Wipe into your browsing routine.